Ready to move your WordPress to a new host or server? We can support you with this task. It is in no time done to move your WordPress website from one hosting provider to another without any help. I have done this a couple of hours ago and will give an overview of all pitfalls.
Table of contents
- Back-up all the files
- Export MySQL database vai phpMyAdmin
- Create database on the new host server or provider
- Import database
- Upload files to the new host server or provider
- Using a tool to find and replace old domain in the database
- Final Thoughts and pitfalls
Back-up all the files
First, connect with SFTP to the host where the WordPress site is hosted and download all the files.
Please notice that this can take a while, and it depends on how many files there are hosted.
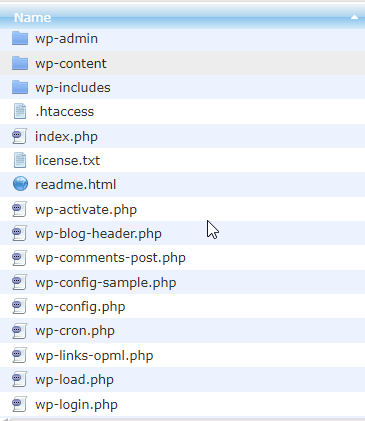
In my case, it took about 30 minutes to download all the files. Unfortunately, Azure hosted my previous version of this site on the lowest tier, and the performance was inferior, including downloading all the files.
The best thing to use is an SFTP client like Filezilla or WinSCP (I used WinSCP – download link).
Another option is to use third-party tools to back up and restore the files, but I didn’t use any tool or plugin.
Export MySQL database via phpMyAdmin
Some configuration is not added into files but stored in the database.
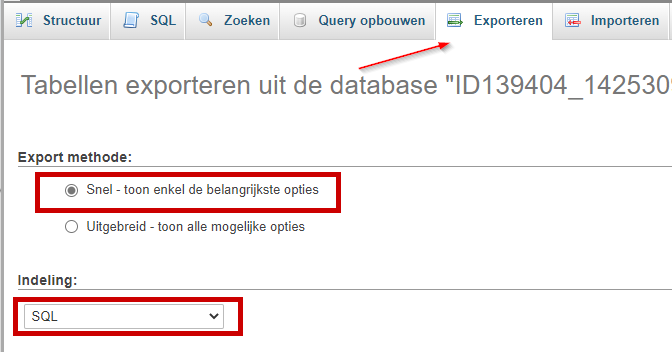
The most used database for WordPress is MySQL, and it comes with is how administrator panel called “phpMyAdmin”. Via the management panel of the provider or host you use, there is a link to navigate to the phpMyAdmin panel.

Select all the tables > Export > Quick in the panel and display only the minimal options.
Then a file with the extension “.SQL” is downloaded to the computer. Keep this file because we need this in another stage.
Create database on the new host server or provider
Before migrating to the new WordPress environment, you need to import the data into the database. But first, you need to create a new database in the phpMyAdmin panel.
The steps to create a database are pretty simple:
- Open MySQL Database and create a new database with an appropriate name for your website.
- Create a new MySQL user (with a secure password).
- Add this user account to the new database and grant it All Privileges.
Please write down the database name, the new MySQL username, and password. You will need them soon.
Import database
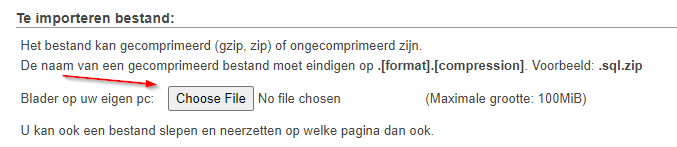
Importing the data into the database is as easy as exporting the data from the platform. First, go to the phpMyAdmin panel and click on Import.
The new database is created and the import process can begin.
In the File to Import section, click the Choose File button and select the SQL file you exported previously.
Un-tick the Partial Import check box, make sure the format is set to SQL, and then click the Go button. The database import will now begin.
The time this import takes varies depending on the size of your database. You should receive a message informing you of the success of the import when it has finished.
The time to finish the import varies depending on the size of the previous (old) database. When the import has finished, you will receive a message.
Upload the files to the new host server or provider
One of the final steps is to upload all the files via SFTP to the new host environment.
Connect to your new host using an SFTP program, then upload all the files to the folder. The folder depends on the hosting provider and could be cms_install > name of WordPress > production or public_html.
Remember that you need to select the correct file. Otherwise the migration will fail.
Using a tool to find and replace old domain in the database
After everything is moved and you log in to your WordPress admin center, all the pages, blogs and other content will be available, even all the plugins you have installed are ready to use. Some plugins need reactivation because some parameters are changed during the migration, like the URL, server, installation, etc…
One of the last steps we need to do is update the database with the new URL. If we don’t do this, some pages will give 404 errors. The best tool to use is “Search Replace DB“.
This tool helps you to replace all old URLs with new ones. The only thing you need to do is follow the instructions on the GitHub page or call me for further help.
Final thoughts and pitfalls
- Don’t forget to clean the cache if your host or provider use some
- Change your DNS records to point to the new host (can take 48 hours before it is active)
- Keep calm. You don’t need to stress out if you read a step twice.
- Search Replace DB is a helpful tool that helps you to accomplish a complex task
I’m happy that the move is over, and the website is hosted on a better platform.
Do you have any questions about this post? Don’t hesitate to contact me the first visit is free!